How To Create Custom Pop-up Lightbox in WIX
- Feb 24, 2018
- 3 min read
Pop-up helps to capture attention, emphasise information or encourage visitor to subscribe. Basically, pop-up Lightbox can contain the same elements as a simple page, but you do not need to create whole page, redirect user and add SEO Title and Description. WIX offers many ready-made layouts, you can choose the one the most similar to one you want on your website and change few details or remake it completely. Let's take a look on some offered lightboxes:


Let's figure out how can we add our own lightbox to our website and how can we change color, font, background, images, add or delete elements and How to set trigger for lightbox on wix.

1. Open the page where you want your lightbox to show up. It is not necessary, but it helps to see how pop-up will look on page. I used an empty page for testing.

2. Add lightbox using the panel on the left. Choose the one which is the most similar to your planned pop-up lightbox. It will help you to make less changes to achieve the desired result. Do not worry if there is no lightbox you like, I will tell you how to change everything in lightbox. Drug and drop!

3. After you dropped your light box it will appear in Pages menu, where you will be able to find lightbox anytime and change it. Now you can change all elements, as on any other page.


4. You can move or delete elements, edit them and resize. I decided to delete all elements and create my own filling. Text can be changed like any other text on WIX websites. Fonts, Font size, text color, text alignment, Effects and spacings can be edited in Text Settings window. NOTE: We do not recommend to use many different styles(fonts, colors, shadows) on your website.


5. You can also add images and shapes/lines to make your pop-up lighntbox on WIX more personal and fit your website's style. 6. The lightbox can have two types of closing: with 'X' icon or "Close" button. You can customize each to fit your needs. Choose another 'X' icon or design 'close' button as you like, move them and resize. NOTE: We recommend not to delete or try to make less visible both of clothing methods, cause it effects negatively affects customer loyalty.

7. Use background settings to add colorful border for your lightbox(if needed), use Box Design to change opacity, simple border, shadow and other customization.
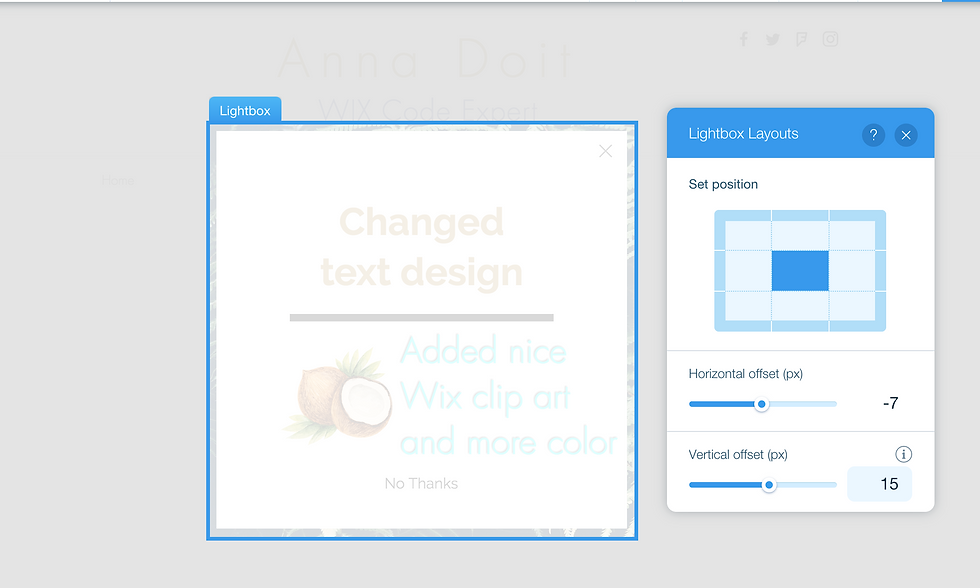
8. Lightbox Layouts will help you to set position of your lightbox(corner, bottom, top, right, left). 9. Overlay Background's opacity can also be changes to let visitor see that he didn't leave the page he wanted to visit before. NOTE: We recommend to save the progress from time to time.


10. Lightbox trigger! Last but not least you need to set up trigger. By default Lightbox will appear automatically on any first page visited by person(one time per person) but you can change it and cancel auto show and set your own triggers! 11. Set Ligtbox trigger as a simple link! Click the element (text or image) you want to be a trigger and add link, choose your Lightbox to link to! Thanks for reading! Leave your comments with feedback or questions. Contact me to get help.


Why Students Say “Do My Assignment For Me” – And What It Really Means
College life often looks exciting from the outside—new friendships, freedom, and exploration. But under the surface, students face relentless academic expectations. Tight deadlines, multiple assignments, and complex topics quickly pile up, leaving little room to breathe. It’s no surprise that more students are turning to online help when the pressure becomes overwhelming.
The phrase “Do My Assignment For Me” is no longer just a desperate Google search—it’s become a call for support, guidance, and academic survival. Platforms like Myassignmenthelp are witnessing a growing number of students reaching out not for shortcuts, but for clarity, structure, and peace of mind.
Why Students Ask for Assignment Help
Many students juggle…